
Object-Oriented Programming with Java, part I + II

This material is licensed under the Creative Commons BY-NC-SA license, which means that you can use it and distribute it freely so long as you do not erase the names of the original authors. If you make changes in the material and want to distribute this altered version of the material, you have to license it with a similar free license. The use of the material for commercial use is prohibited without a separate agreement.
Authors: Arto Hellas, Matti Luukkainen
Translators to English: Emilia Hjelm, Alex H. Virtanen, Matti Luukkainen, Virpi Sumu, Birunthan Mohanathas, Etiënne Goossens
Extra material added by: Etiënne Goossens, Maurice Snoeren, Johan Talboom
The course is maintained by Technische Informatica Breda
Graphical User Interfaces
Let’s look at creating Graphical User Interfaces (GUI). Graphical user interfaces differ from the previously used text user interfaces in several ways. When creating graphical user interfaces, we primarily use libraries that provide ready-to-use grapical components such as text boxes and buttons.
User inputs handling also differs from text user input. In which textual interfaces the functionality is coupled to a particular form of input, in graphical user interfaces that functionality needs to be added to handle the user interface input. For example, a programmer adds a method to a button related to pressing a button in the user interface.
We are using the Java JavaFX User Interface Library to create graphical user interfaces.
Graphical user interfaces and required libraries
The JavaFx library is used to create graphical user interfaces. With Linux machines - depending on Java installation - install the openjfx library as well. To install this in Ubuntu (command line) command:
sudo apt-get install openjfxYou can find some test code on JavaFx to verify if your installation is working correctly.
A simple window can be created with JavaFX using the following program.
import javafx.application.Application;
import javafx.stage.Stage;
public class JavaFxExample extends Application {
@Override
public void start(Stage stage) {
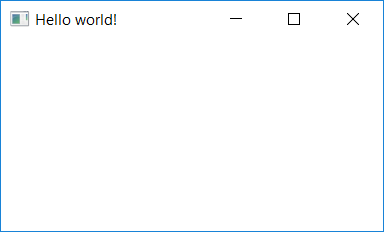
stage.setTitle("Hello world!");
stage.show();
}
public static void main(String[] args) {
launch(JavaFxExample.class);
}
}
When the program starts, the application looks like this.
What’s wrong with the program? Our class JavaFxExample inherits a Class Application that provides a framework for creating graphical user interfaces. The application is launched by the application class method launch, which will be given a class name ClassName.class to be launched as a parameter.
When the method launch is called, the method in the Application class creates a new object of the class given in the parameter and invokes the method init. The method init is inherited from Application class, and is used to initialize objects that are used inside the program. We left it out of this, because our program is quite simple. After invoking the method, the program calls the method start, which gets a Stage object describing the window as a parameter. In the implementation above of the methode start, the stage object is given as a parameter and sets the title by the method setTitle, after the method show called the window we be displayed. Eventually, the program will listen to user interface events such as window closure, which will lead to the application shutdown.
Exercise gui-basics-1 My Application
Implement a graphical user interface with the title “My Application”. The application should start when the main method is executed.
ATTENTION: Both here and in the upcoming task tests run the application. Existing tests have identified problems with Windows operating systems when the operating system scales the screen (occurs at large resolutions). Even if the tests do not work correctly locally, you can return the task to TMC, which provides feedback for the tests.
Structure of the user interface
The graphical user interfaces consist of essentially three parts. Stage is a program window. A Stage Object is set to a Scene object that reflects the view in the window. The Scene Object, however, includes an object corresponding to the layout of related components (e.g., FlowPane), which again contains specific user interface components.
The program below creates a user interface with a single button.
import javafx.application.Application;
import javafx.scene.Scene;
import javafx.scene.control.Button;
import javafx.scene.layout.FlowPane;
import javafx.stage.Stage;

public class JavaFxExample extends Application {

    @Override
    public void start(Stage stage) {
        Button button = new Button("First button!");

        FlowPane componentGroup = new FlowPane();
        componentGroup.getChildren().add(button);

        Scene scene = new Scene(componentGroup);

        stage.setScene(scene);
        stage.show();
    }

    public static void main(String[] args) {
        launch(JavaFxExample.class);
    }
}
The application looks like this:

The user interface components are added to the “corresponding child” of the object corresponding to their layout - above the FlowPane. This is related to the decision made in JavaFx design, where any object used to set the user interface components may contain other objects used for the layout of the user interface components and, of course, also user interface components. This enables graphical user interfaces, the way the user interface components are placed depends on their location in the user interface. For example, the options in the top menu in the UI are usually placed side by side, while the items are listed below.
The structure of the user interface is therefore briefly as follows. The window contains a Scene object. The Scene Object contains an object corresponding to the layout of the user interface components. The object corresponding to the layout of the user interface components can include both user interface components and objects corresponding to the layout of the user interface components.
User interface Components
When creating graphical user interfaces, programmers typically utilize the components provided by ready-made UI libraries to develop applications. For example, the programmer should not create a user interface button from scratch (for example, create a class that draws a button and enables processing of related functionality), since the corresponding component is usually available from the user interface libraries. Let’s look at the next few user interface components.
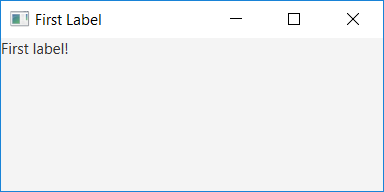
Text is displayed using the Label component. Label provides a user interface component that can be set to text and the text can be edited using methods. The displayed text is set either in the constructor or in a separate methode setText.
import javafx.application.Application;
import javafx.scene.Scene;
import javafx.scene.control.Label;
import javafx.scene.layout.FlowPane;
import javafx.stage.Stage;

public class JavaFxExample extends Application {

    @Override
    public void start(Stage stage) {
        Label label = new Label("First label!");

        FlowPane componentGroup = new FlowPane();
        componentGroup.getChildren().add(label);

        Scene scene = new Scene(componentGroup);

        stage.setScene(scene);
        stage.show();
    }

    public static void main(String[] args) {
        launch(JavaFxExample.class);
    }
}
You can use the Button component to add buttons on the user interface. Adding a button to a user interface is just like adding a text element.
import javafx.application.Application;
import javafx.scene.Scene;
import javafx.scene.control.Button;
import javafx.scene.layout.FlowPane;
import javafx.stage.Stage;

public class JavaFxExample extends Application {

    @Override
    public void start(Stage stage) {
        Button button = new Button("First button!");

        FlowPane componentGroup = new FlowPane();
        componentGroup.getChildren().add(button);

        Scene scene = new Scene(componentGroup);

        stage.setScene(scene);
        stage.show();
    }

    public static void main(String[] args) {
        launch(JavaFxExample.class);
    }
}
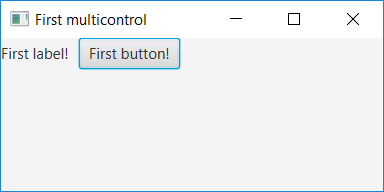
Multiple user interface elements can also be added to the application at the same time. Below a button and a text element are added inside the same application.
import javafx.application.Application;
import javafx.scene.Scene;
import javafx.scene.control.*;
import javafx.scene.layout.FlowPane;
import javafx.stage.Stage;

public class JavaFxExample extends Application {

    @Override
    public void start(Stage stage) {
        Label label = new Label("First label!");
        Button button = new Button("First button!");

        FlowPane componentGroup = new FlowPane();
        componentGroup.setHgap(10);
        componentGroup.getChildren().add(label);
        componentGroup.getChildren().add(button);

        Scene scene = new Scene(componentGroup);

        stage.setScene(scene);
        stage.show();
    }

    public static void main(String[] args) {
        launch(JavaFxExample.class);
    }
}
The application looks like this:
At https://docs.oracle.com/javase/8/javafx/user-interface-tutorial/, a number of ready-to-use interface components are listed. The page also provides examples of how to use user interface components.
There are a considerable number of user interface components. You should use online ready-to-use tutorials, such as https://docs.oracle.com/javase/8/javafx/user-interface-tutorial/. It is worth first trying out user interface components to experiment with adding just one component and reviewing its functionality.
As individual components become familiar, their use is more straightforward. Almost all components are added in the same way to the application. As you know how to add a single component to your UI, you can virtually add all components to the UI.
The only significant difference between adding user interface components is to the point where the component user wants to display the component on the interface. Let’s look at the layout of the interface components.
Exercise gui-basics-2 Button and label
create a user interface with a button (
Button) and a text element (Label). The button should be on the left or above the text element.Exercise gui-basics-3 Button and text field
Create a graphical user interface with a button and a text field. The text field can be creating with the component TextField. The button should be placed left or above the text field.
Layout of user interface components
Each user interface component has a location in the UI. The component’s location is determined by the class used to set up the user interface components.
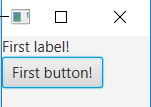
In the above examples, we used the class FlowPane for the layout of the user interface components. With FlowPanel, the components that are added to the user interface will be placed side by side. If the size of the window decreases so that all the components do not fit next to each other, the components are automatically wrapped. In the figure below, the application generated by the previous example is narrowed, so that the elements are automatically routed.
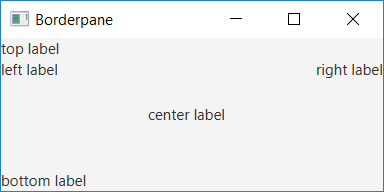
BorderPlane
The BorderPane component allows the user interface components to be set to five main locations: top, right, bottom, left and middle. Traditional apps, such as your web browser, use this layout style. At the top, there is a menu with an address bar, and the middle is the page content.
import javafx.application.Application;
import javafx.scene.Scene;
import javafx.scene.control.*;
import javafx.scene.layout.BorderPane;
import javafx.stage.Stage;

public class JavaFxExample extends Application {

    @Override
    public void start(Stage stage) {
        BorderPane borderPane = new BorderPane();
        borderPane.setTop(new Label("top label"));
        borderPane.setRight(new Label("right label"));
        borderPane.setBottom(new Label("bottom label"));
        borderPane.setLeft(new Label("left label"));
        borderPane.setCenter(new Label("center label"));

        Scene scene = new Scene(borderPane);

        stage.setScene(scene);
        stage.show();
    }

    public static void main(String[] args) {
        launch(JavaFxExample.class);
    }
}
Exercise gui-basics-4 BorderPane
Create a graphical user interface that uses the class
BorderPanefor component layout. Add a text component with the text “NORTH” to the top, the text “EAST” on the right and the bottom of the text component with the text “SOUTH”.
HBox
The HBox component allows the user interface components to be horizontal aligned.
    @Override
    public void start(Stage stage) {
        HBox hBox = new HBox();
        hBox.setSpacing(10);
        hBox.getChildren().add(new Label("One"));
        hBox.getChildren().add(new Label("Two"));
        hBox.getChildren().add(new Label("Three"));

        Scene scene = new Scene(hBox);

        stage.setScene(scene);
        stage.show();
    }
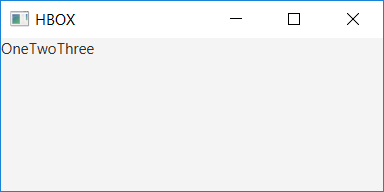
As noted in the previous example, HBox sets the interface components by default directly towards each other. With the method setSpacing, the amound of spacing between the components can be set.
@Override
    public void start(Stage stage) {
        HBox hBox = new HBox();
        hBox.setSpacing(10);
        hBox.getChildren().add(new Label("One"));
        hBox.getChildren().add(new Label("Two"));
        hBox.getChildren().add(new Label("Three"));

        Scene scene = new Scene(hBox);

        stage.setScene(scene);
        stage.show();
    }
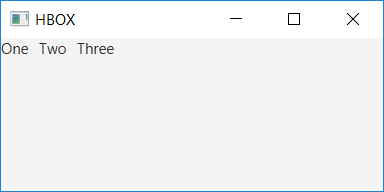
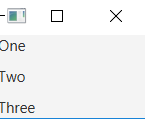
The class VBox works accordingly, but puts the user interface components vertically.
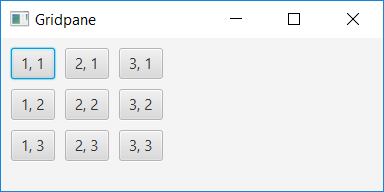
GridPane
GridPane allows the user interface components to be placed in a grid. In the example below, a 3x3-square grid is created, each box contains a button.
@Override
public void start(Stage stage) {
    GridPane  gridPane = new GridPane();
    gridPane.setHgap(10);
    gridPane.setVgap(10);

    for (int x = 1; x <= 3; x++) {
        for (int y = 1; y <= 3; y++) {
            gridPane.add(new Button("" + x + ", " + y), x, y);
        }
    }

    Scene scene = new Scene(gridPane);

    stage.setScene(scene);
    stage.show();
}
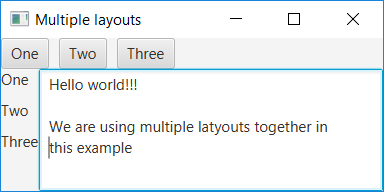
Multiple layers in the same interface
Layouts used in user interface components can also be combined. A typical solution is to use the BorderPane Layout on the base where other layouts are placed. In the example below, the top of the BorderPanes has a HBox used for the same line layout and the VBox used to fit the left-hand side. A text field is placed in the middle.
import javafx.application.Application;
import javafx.scene.Scene;
import javafx.scene.control.*;
import javafx.scene.layout.BorderPane;
import javafx.scene.layout.HBox;
import javafx.scene.layout.VBox;
import javafx.stage.Stage;

public class JavaFxExample extends Application {

    @Override
    public void start(Stage stage) {
        BorderPane borderPane = new BorderPane();

        HBox hBox = new HBox();
        hBox.setSpacing(10);
        hBox.getChildren().add(new Button("One"));
        hBox.getChildren().add(new Button("Two"));
        hBox.getChildren().add(new Button("Three"));

        VBox vBox = new VBox();
        vBox.setSpacing(10);
        vBox.getChildren().add(new Label("One"));
        vBox.getChildren().add(new Label("Two"));
        vBox.getChildren().add(new Label("Three"));

        borderPane.setTop(hBox);
        borderPane.setLeft(vBox);
        borderPane.setCenter(new TextArea());

        Scene scene = new Scene(borderPane);

        stage.setScene(scene);
        stage.show();
    }

    public static void main(String[] args) {
        launch(JavaFxExample.class);
    }
}
Exercise gui-basics-5 Text Statistics
Create an application that uses the component
BorderPanefor the layout in the classTextStatisticsApplication. In the middle, you should have a text field (TextArea), and at the bottom add three text components. Place the text components in the bottom usingHBoxcomponent. The first Label should display the text “Letters: 0”. The second Label should display the text “Words: 0”. The third Label displays the text “The longest word is:”.
Event Handling
The above interfaces do not react to events in the UI. This is not due to user interface components, but because we have not implemented the functionality required to handle events from the user interface components.
Pressing the buttons will be handled with in the class when you implement the interface EventHandler. The event type is ActionEvent. The implementation of the interface defines what needs to done when the user presses the button.
Button button1 = new Button("One");
button1.setOnAction(new EventHandler<ActionEvent>() {
    @Override
    public void handle(ActionEvent event) {
        System.out.println("Hello World!");
        }
});
The explicit implementation of the interface can be replaced by a Lambda expression.
Button button1 = new Button("One");
button1.setOnAction((event) -> {
    System.out.println("Hello World!");
});
When the button above is pressed, the word “Hello World!” Is printed in the console.
Event handlers associated with user interface components like the EventHandler we used above, are always linked to specific user interface component. Each time a method is applied to the user interface component, for example, pressing a button on a button, each event handler associated with that specific user interface component is called and the associated program code is executed.
Typically, we want the event handler to modify the status of an object. To get access to the object, the event handler has a reference to the object being handled. Consider the following UI with two text fields and a button.
@Override
public void start(Stage stage) {
    TextField textFieldLeft = new TextField();
    TextField textFieldRight = new TextField();
    Button button = new Button("Copy");

    HBox hBox = new HBox();
    hBox.setSpacing(20);
    hBox.getChildren().addAll(textFieldLeft, button, textFieldRight);

    Scene scene = new Scene(hBox);

    stage.setScene(scene);
    stage.show();
}
There is a text field on the left and right of the user interface. In addition to the text fields, there is a button labeled “Copy” in the center of the user interface.
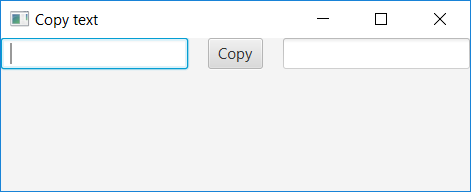
We would like to create a program where the contents of the left text field will be copied into the content of the right field when the user presses the button. This is achieved through the interface EventHandler. The method to implement must be able to use the above defined objects, if the values of the objects are not redefined with the same name (ie the references do not change).
@Override
public void start(Stage stage) {
    TextField textFieldLeft = new TextField();
    TextField textFieldRight = new TextField();
    Button button = new Button("Copy");

    button.setOnAction(event -> {
        textFieldRight.setText(textFieldLeft.getText());
    });
    HBox hBox = new HBox();
    hBox.setSpacing(20);
    hBox.getChildren().addAll(textFieldLeft, button, textFieldRight);

    Scene scene = new Scene(hBox);

    stage.setScene(scene);
    stage.show();
}

Exercise gui-basics-6 I Alerted You
Implement a user interface class that contains three user interface components. The top component is the text field (
TextField), the middle component button (Button), and on the bottom a text element (Label). Arrange components using the classVBox. The interface should display (for example) the following.
Then add functionality to the application that button will copy the textfield to the text element. In the example below, the text “Hi student!” Is written in the text element, after which the button is pressed.
Exercise gui-basics-7 Tic-tac-toe game
In this exercise, you will create 3x3 tic-tac-toe game. The exercise is divided into three parts: first, the user interface components are created, then the functionality of the buttons, and finally the task to complete the game.
Notice: You get the best button layout by changing the font and fontsize. In the screenshot, the font used by the buttons is set as follows:
Button button = new Button(" ");
button.setFont(Font.font("Monospaced", 40));
Exercise gui-basics-7.1. User Interface
Edit source of the application to start the graphical user interface. Use the
BorderPanecomponent first to set up the user interface components. PlaceBorderPaneat the top of a text component that contains information in turn and the end of the game about the end of the game. Place aGridPanein the center ofBorderPane, which contains 9 buttons.GridPanemust have 3 rows and 3 columns, making a 3x3 button grid.Exercise gui-basics-7.2. Changing routes and fair play
The game is played by X and O. The game always starts with X. Adds to the game the function where the button is pressed to update the situation by inserting the character of the player in turn (if X is the turn, X will be in the button). The turn then moves to the next player.
The text field at the top of the game must always tell the player in turn. The text is initially “Turn X”. When X plays its turn, i.e. presses a button, the text is set to “Turn: O”. After O plays its turn, the text “Turn X” is set again.
Notice: If a player has already played a particular screen, no other player can play it anymore. Make sure the turn does not change when a player tries to play the already played screen.
Note 2! The error that you may encounter is “Local variables referenced from a lambda expression must be final or effectively final” because interfaces made from interfaces can not use variables defined outside the method. You can “circumvent” an error by creating new variables that you set up problematic values just before they were introduced in the method.
Exercise gui-basics-7.3: Completing the game
Add game functionality to where the game can be played. The game ends if one of the players gets three of the same characters in the line (vertical, horizontal, oblique). The end of the game should be displayed with the text “End!” On the top. After this, the game will no longer be able to continue.


The event handler that is used depends on the user interface component to which the event handler is connected. If we would like to track changes in the text field from a single character, we would use the interface ChangeListener. In the example below, a changeListener implementation is linked to the left text field, which both prints the changes to the text console and always sets a new value to the right text field.
leftTextArea.textProperty().addListener(new ChangeListener<String>() {
    @Override
    public void changed(ObservableValue<? extends String> muutos,
            String oldValue, String newValue) {

        System.out.println(oldValue + " -> " + newValue);
        rightTextArea.setText(newValue);
    }
});
The above changes are observed in the text associated with the text field. Because text is in strings, a character string is given to the interface for the changes. As above, in this example too, the program code can be presented in a shorter format.
leftTextArea.textProperty().addListener((changedValue, oldValue, newValue) -> {
    System.out.println(oldValue + " -> " + newValue);
    rightTextArea.setText(newValue);
});
The program can also make statistics. The values of the text fields generated in the previous task can be calculated fairly straightforwardly. Following the example below, the values would be updated each time a user changes the content of the text field.
leftTextArea.textProperty().addListener((changedValue, oldValue, newValue) -> {
    int letterCount = newValue.length();
    String[] splitString = newValue.split(" ");
    int wordCount = splitString.length;
    String lastWord = Arrays.stream(splitString)
        .sorted((s1, s2) -> s2.length() - s1.length())
        .findFirst()
        .get();
});
Exercise gui-basics-8 Text Statistics Part II
Copy the previous exercise text statistics inside the class from the project and include the functionality as seen in the above example to calculate the statistics. As a result, the program should calculate statistics from the written text that will automatically update to the application.

Separation of application logic and user interface logic
In general, the application logic (such as checking the data) and maintaining the user interface are location in the same class is generally a bad thing. It makes it hard to maintain the source code and testing the programs programs functionality. The motto “There should be only one clear responsibility for every class” is applicable for User Interfaces as well.
Consider the separation of application logic and user interface logic. Let’s assume that we have the next interface and we want to make the user interface PersonalCollection.
public interface PersonCollection {
    void Save(Person person);
    Person get(String personId);

    void Delete(Person person);
    void Delete(String personId);
    void DeleteAll();

    Collection<Person> AllPersons();
}
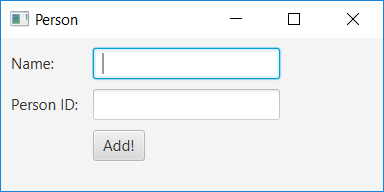
When implementing the user interface, a good way to start is to first to draw a user interface, followed by adding appropriate user interface components to the user interface. When saving people, we need fields for the name, the personal ID and a button for adding a person. Use a class to enter the name and a personal ID (TextField) and a save Button for the implementation. The styling for the user interface components is also added to the class.
When using the layout GridPane. The interface is devided in 3 rows and 2 columns. The event handling functionality will be added later. For creating the user interface design we are using the following code:
@Override
public void start(Stage stage) {
    Label nameLabel = new Label("Name: ");
    TextField nameText = new TextField();
    Label personIdLabel = new Label("Person ID: ");
    TextField personIdText = new TextField();

    Button addButton = new Button("Add!");

    GridPane gridPane = new GridPane();
    gridPane.add(nameLabel, 0, 0);
    gridPane.add(nameText, 1, 0);
    gridPane.add(personIdLabel, 0, 1);
    gridPane.add(personIdText, 1, 1);
    gridPane.add(addButton, 1, 2);

    // Layout settings of the UI
    gridPane.setHgap(10);
    gridPane.setVgap(10);
    gridPane.setPadding(new Insets(10, 10, 10, 10));

    Scene scene = new Scene(gridPane);

    stage.setScene(scene);
    stage.show();
}
Next, we implement the interface ActionEvent in the Button add, using Lambda expression.
@Override
public void start(Stage stage) {
    // ...
    addButton.setOnAction((event) -> {
        personCollection.Add(new Person(nameText.getText(), personIdText.getText());
    });
    // ...
}
But. Where do we create the collection PersonCollection? for example, It is created at the beginning of the start method. Below, the entire application code.
import javafx.application.Application;
import javafx.geometry.Insets;
import javafx.scene.Scene;
import javafx.scene.control.*;
import javafx.scene.layout.GridPane;
import javafx.stage.Stage;

public class JavaFxExample extends Application {

    @Override
    public void start(Stage stage) {

        PersonCollection personCollection = new ConcretePersonCollection();
        Label nameLabel = new Label("Name: ");
        TextField nameText = new TextField();
        Label personIdLabel = new Label("Person ID: ");
        TextField personIdText = new TextField();

        Button addButton = new Button("Add!");
        addButton.setOnAction((event) -> {
                Person person = new Person(nameText.getText(), personIdText.getText());
                personCollection.Add(person);
        });
        GridPane gridPane = new GridPane();
        gridPane.add(nameLabel, 0, 0);
        gridPane.add(nameText, 1, 0);
        gridPane.add(personIdLabel, 0, 1);
        gridPane.add(personIdText, 1, 1);
        gridPane.add(addButton, 1, 2);

        // Layout settings of the UI
        gridPane.setHgap(10);
        gridPane.setVgap(10);
        gridPane.setPadding(new Insets(10, 10, 10, 10));

        Scene scene = new Scene(gridPane);

        stage.setScene(scene);
        stage.show();
    }

    public static void main(String[] args) {
        launch(JavaFxExample.class);
    }
}
Starting the application from outside the class
The entry point for JavaFX applications is the class Application. Till now we initialized the class Application inside the same class using the method main. But it’s possible to load the instance of Application from a seperate class as can be seen below
import javafx.application.Application;
import javafx.stage.Stage;

public class JavaFxApplication extends Application {

    @Override
    public void start(Stage stage) {
        stage.setTitle("Hei Maailma!");
        stage.show();
    }
}
You can start an application from a class other than the class Application by launch using the second-class. In the example below, a separate class Main launches the application.
import javafx.application.Application;

public class Main {

    public static void main(String[] args) {
        Application.launch(JavaFxApplication.class);
    }
}
When executing the method main, The class JavaFxApplication will be started using the Application method launch.
It’s possible to provide parameters with the Application method launch, so it can be used inside the JavaFxApplication. The number of parameters is not limited, but the type of parameter can only be a String. In the initialized class we can use the method getParameters() to get the parameters.
import javafx.application.Application;
import javafx.application.Application.Parameters;
import javafx.stage.Stage;

public class JavaFxApplication extends Application {

    @Override
    public void start(Stage stage) {
        Parameters params = getParameters();
        String organization = params.getNamed().get("organization");
        String course = params.getNamed().get("course");

        stage.setTitle(organization + ": " + course);
        stage.show();
    }
}
Now, we gonna launch the application using the following code:
import javafx.application.Application;

public class Main {

    public static void main(String[] args) {
        Application.launch(JavaFxApplication.class,
            "--organization=AvansTI",
            "--course=OGP1");
    }
}
Exercise gui-basics-9 User Interface Title
Write a program that asks the user for the application title (using the command line). When the user enters a title and presses enter, the user interface will be launced and the Window title will be set.
Notice that there are no automatic tests for this exercise.